
If you’re checking Google Search Console and notice that the robots.txt file is blocking your website, you’re probably wondering how to resolve this issue. In this post, I will explain what is causing the problem and provide a quick fix.
So, what is robots.txt? It’s a set of instructions for web robots, like Googlebot, telling them which parts of your site they can and cannot crawl. Think of it like a bouncer at a club, deciding who gets in and who doesn’t.
If Google can’t crawl your site, it can’t index your content. And if it can’t index your content, your site won’t show up in search results. That’s a big problem!
This post will show you why your site might be blocked, how to find the problem using Google Search Console, what the robots.txt code looks like, and step-by-step solutions to get Google back on track.
Why is Google (or Other Crawlers) Being Blocked? Common Scenarios
Accidental Mistakes
This is the most common reason. It often happens when a site is being built or moved.
- “Disallow all” during setup: Developers often block entire sites when they’re working on them to keep unfinished content out of search results. They might forget to remove the block before the site goes live.
- CMS default settings: Some Content Management Systems (CMS) might have robots.txt settings that are too strict by default.
- Typos: Even a single wrong character can completely change what a rule does.
Blocking Things on Purpose (with unexpected results)
- You might want to block admin pages, private user data, or duplicate content, but you accidentally block too much.
- Sometimes you block old pages you don’t want indexed, but the robots.txt rule is too broad and catches other pages too.
Security Features Gone Wrong:
Occasionally, security plugins or settings can accidentally block legitimate search engine crawlers.
The Code of the Block: What a Restrictive robots.txt Looks Like
The robots.txt file uses simple instructions like User-agent and Disallow.
- User-agent: This line tells which specific robot the rule applies to. User-agent: * means the rule applies to all robots. User-agent: Googlebot means the rule only applies to Google’s crawler.
- Disallow: This line tells the robot which part of the site it shouldn’t access.
Here are some examples of robots.txt files that block content:
Example 1: Blocking the Entire Site
This is common for sites still in development.
User-agent: *
Disallow: /
This rule applies to all crawlers (User-agent: *) and tells them to stay out of the entire website (Disallow: /).
Example 2: Blocking Specific Directories
This blocks certain folders, like an administration area.
User-agent: Googlebot
Disallow: /wp-admin/
Disallow: /private/
Explanation: Only Googlebot (User-agent: Googlebot) is told not to access the /wp-admin/ folder and a hypothetical /private/ folder.
Example 3: Blocking Specific Files
This can block a single file you don’t want indexed.
User-agent: *
Disallow: /secret-document.pdf
Explanation: All crawlers (User-agent: *) are told not to access the file named /secret-document.pdf.
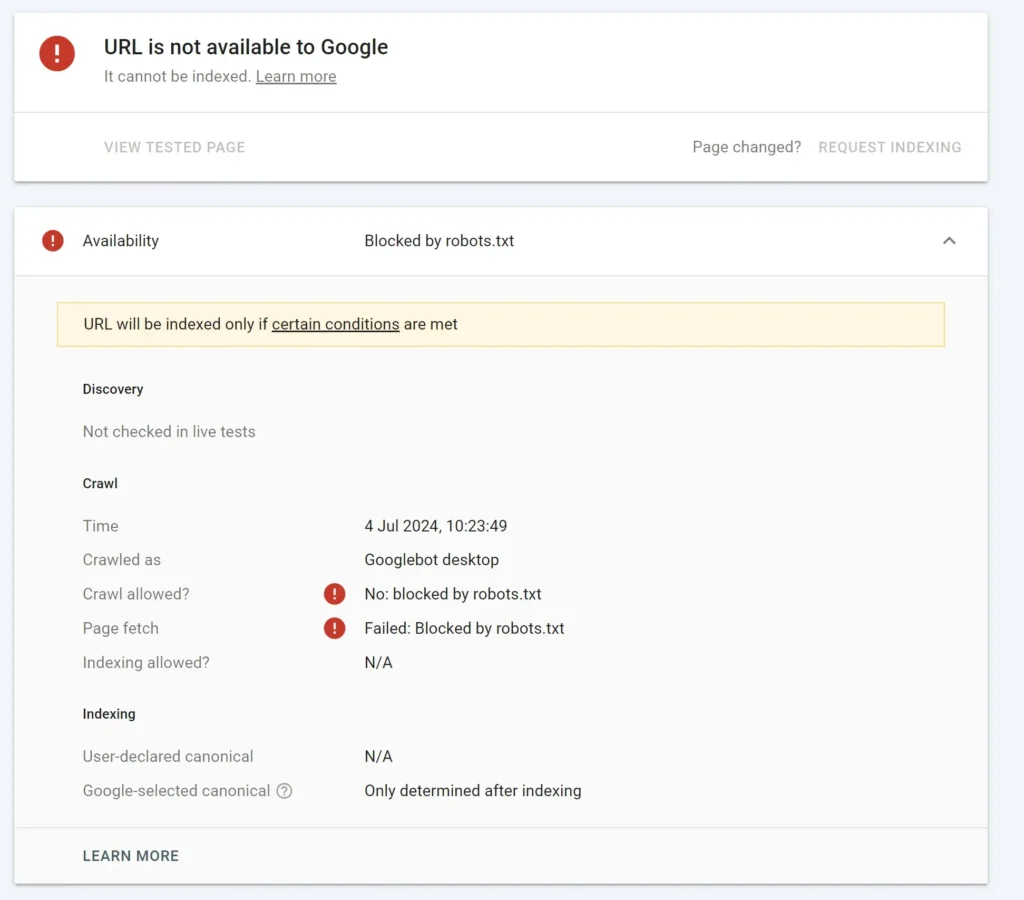
Identifying the Problem: Google Search Console to the Rescue (with Screenshots!)
Accessing Google Search Console: Brief instructions on how to log in and select your property.
Google Search Console is your best friend when it comes to finding robots.txt issues. It acts like a direct line to how Google sees your website.
First, you need to log in to Google Search Console and select your website property. If you haven’t added your site yet, you’ll need to do that first.
Here’s how to check for robots.txt problems:
1. Check the robots.txt Tester Tool
This tool shows you the exact robots.txt file that Google is currently using for your site, and lets you test if specific pages are blocked.
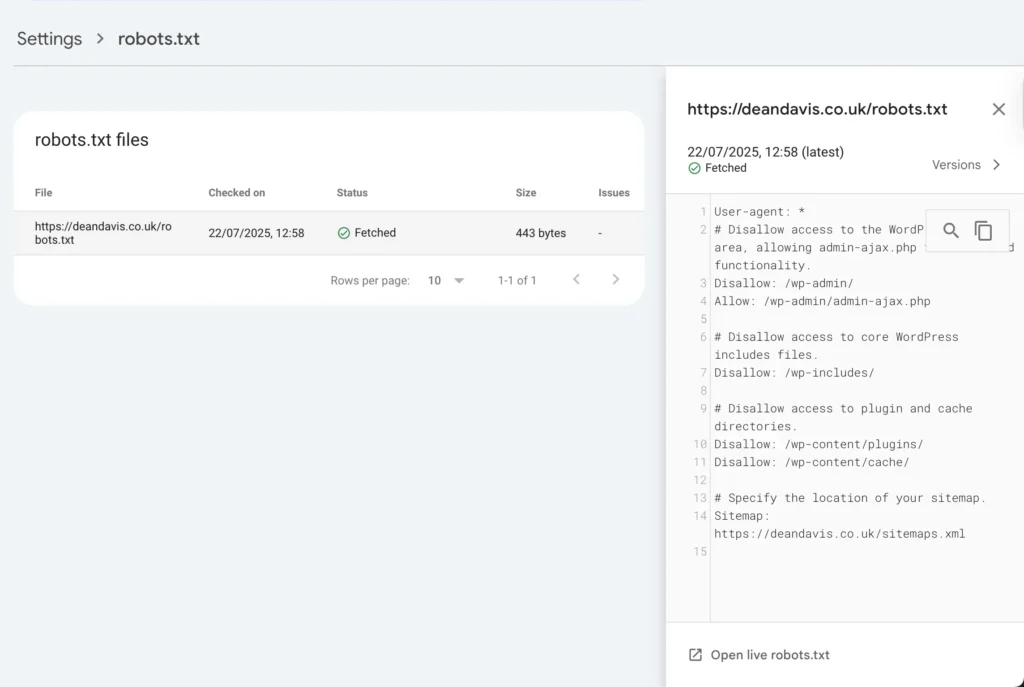
- Where to find it: In the left-hand menu of Search Console, scroll down to “Settings”, then click on “Crawling”, and finally “Robots.txt tester”.
- See your current
robots.txt: When you open the tester, you’ll see a text editor area that displays therobots.txtfile Google has currently fetched from your website. This is important because it shows you what Google is actually working with, which might be different from what you think is on your server if it hasn’t updated yet. - Test a URL: Below the
robots.txtcontent, there’s a box where you can type in a specific URL from your site. After typing it, click “TEST.” The tool will tell you if that URL is “ALLOWED” or “BLOCKED” by therobots.txtfile shown above. If it’s blocked, it will even highlight the specific line in yourrobots.txtfile that’s causing the block.
This screenshot shows the robots.txt file Google has, a URL being tested, and the result of that test.
The Solution: What a Good robots.txt File Looks Like (to Allow Access)
A correctly configured robots.txt file ensures that Google and other search engines can crawl your website as needed.
The “Allow All” robots.txt (for most standard websites):
For most websites that want all their content to be found by search engines, this is the best setup:
User-agent: *
Allow: /
Explanation: User-agent: * means this rule applies to all search engine crawlers. Allow: / explicitly tells them they can access the entire website, starting from the root directory.
Allowing All, with Specific Disallows (for more control):
If you have specific areas you truly want to keep out of search results (like an admin panel), you can combine the “allow all” with specific “disallow” rules.
User-agent: *
Disallow: /wp-admin/
Disallow: /wp-includes/
Disallow: /cgi-bin/
Disallow: /temp/
Allow: /
Explanation: This setup allows everything by default (Allow: /), but then specifically tells all crawlers (User-agent: *) not to enter certain folders that usually don’t need to be indexed (like /wp-admin/ or temporary files in /temp/).
Important Things to Include:
Sitemap directive: It’s good practice to include the link to your sitemap in your robots.txt file. This helps crawlers find all the important pages on your site.
Sitemap: https://www.yourdomain.com/sitemap.xmlNoIndex vs. Disallow: It’s important to know the difference:
robots.txt(Disallow): This prevents search engines from crawling (visiting) a page. If they can’t crawl it, they can’t read its content.noindexmeta tag: This allows search engines to crawl a page, but tells them not to show it in search results (not to index it). You put this tag in the HTML of the page itself.- Use
robots.txtwhen you want to save crawl budget (stop crawlers from wasting time on unimportant pages). Usenoindexwhen you want Google to know about a page but not show it in search results (e.g., a “thank you” page after a form submission).
What to do with the right robot.txt file
To fix your robots.txt file, you first need to find it on your web server. This file is always located in the root directory of your website. Think of the root directory as the main folder where all your website’s files live.
Here are the most common ways to find it:
- Using an FTP/SFTP Client:
- If you manage your website files using a program like FileZilla, Cyberduck, or Transmit, connect to your website.
- Once connected, you’ll typically see a folder structure. Look for the main folder that contains your website’s public files. This is often named
public_html,www,htdocs, or your domain name. - Inside this folder, you should find a file named
robots.txt.
- Through Your Hosting Control Panel’s File Manager:
- Most web hosting providers (like Bluehost, SiteGround, HostGator, etc.) offer a control panel (often cPanel or a custom one) where you can manage your website.
- Log in to your hosting account and look for a section called “File Manager” or “Files.”
- Navigate to your website’s root directory (again, typically
public_html,www, or your domain’s folder). - You’ll find the
robots.txtfile there.
For WordPress Users:
WordPress handles robots.txt a bit differently. By default, WordPress generates a virtual robots.txt file on the fly. This means there might not be a physical robots.txt file in your root directory if you haven’t created one yourself or used a plugin that does so.
- You can see what WordPress is generating by going to
yourdomain.com/robots.txtin your browser. - Many SEO plugins for WordPress, like Yoast SEO or Rank Math, have built-in
robots.txteditors that allow you to modify this virtual file through your WordPress dashboard. This is usually the easiest way to manage it for WordPress sites.
Overriding WordPress’s Virtual robots.txt:
If you prefer to have full control, or if you’re having issues with the virtual file, you can manually create and upload your own robots.txt file to your website’s root directory.
- If you upload a physical
robots.txtfile to your root directory (using FTP/SFTP or your hosting’s File Manager), it will override the virtualrobots.txtfile that WordPress generates. Google and other crawlers will then use your uploaded file instead. - This is a good method if you need very specific rules that a plugin might not easily allow, or if you’re troubleshooting a persistent issue.
Once you’ve located it (or decided to create and upload one), you can open it with a simple text editor to view or edit its contents.
After the Fix: Verification and Patience
You’ve made the changes – great! Now, you need to check if they worked and then be a little patient.
Step 1: Test with Search Console’s robots.txt Tester.
Go back to the robots.txt Tester in Google Search Console. Test the URLs that were previously blocked. Make sure they now show as “Allowed.”
Step 2: Re-request Indexing in Search Console.
For important pages that were blocked, use the URL Inspection Tool again and click “Request Indexing.” This tells Google you’ve fixed the issue and you want them to revisit the page.
Step 3: Monitor the Coverage Report.
Keep an eye on the Coverage report in Search Console. Over time, you should see the number of “Blocked by robots.txt” URLs go down, and your “Indexed” URLs go up.
A Note on Time and Patience:
Even after you’ve changed your robots.txt file and everything looks correct in the tester, Google Search Console can still take a little bit of time to show that it’s no longer blocked. This is completely normal, and you shouldn’t worry about it. It can normally take up to a day, or sometimes even a few days, before the changes fully show up in Search Console reports. Google’s crawlers need time to revisit your site, see the updated robots.txt file, and then process those changes.