
As a freelance web designer, implementing schema markup for my clients is one of the most cost-effective ways to boost their websites’ visibility and performance. Schema markup is a type of structured data that helps search engines understand a website’s content, leading to enhanced search results, improved click-through rates, and stronger SEO. Below, I’ll walk you through what schema markup is, why I always add it for clients, and the best techniques—manual and plugin-based for adding schema to WordPress sites today.
What is Schema Markup and Why is it Essential?
Schema markup is a standardised vocabulary (often using JSON-LD or Microdata formats) that you add to your site’s HTML, allowing search engines to understand your content better. For example, it can tell Google whether your page is a blog post, local business, event, product, or FAQ.
Benefits for Web Design Clients:
- Improved SEO: Provides search engines with extra context, enhancing how content is indexed and displayed.
- Rich snippets: Boosts search results with star ratings, products, recipes, event info, and more.
- Better local SEO: Great for local businesses by surfacing reviews, locations, opening hours, and contacts.
- Higher click-through rates: Richer results attract more clicks from SERPs.
- Enhanced Knowledge Panels: Brings brand visibility and authority in Google’s right-side info panels.
- Clearer Social Connections: Can link social profiles to websites, strengthening online presence for personal brands.
As a freelancer, offering schema implementation has helped countless clients gain more relevant traffic and better conversion rates.
Methods: How To Add Schema Markup in WordPress
1. Using Schema Plugins (Recommended for Most Clients)
Plugins are the fastest, safest, and most scalable option—especially for non-technical clients.
Top Schema Plugins:
How to Add Schema with Plugins:
- Install and activate your chosen plugin.
- Configure Site-wide Schema (organisation or person, business info, social profiles).
- Select Schema Types per post/page (articles, events, products, etc.).
- Validate using Google’s Rich Results Test or Schema Markup Validator.
Tip: Most leading SEO plugins (like Yoast, AIOSEO) now add article and other schema types automatically, with options to customise further.
2. Adding Schema Markup Manually (More Control, No Plugin Bloat)
A. Insert Schema in Header.php or Theme Files
Generate Schema Code using tools like Google’s Structured Data Markup Helper.
Edit Theme Files:
Go to Appearance > Theme File Editor > header.php.
Before the closing </head> tag, add your schema JSON-LD inside:
xml

<script type="application/ld+json">

{ ...your schema JSON... }

</script>
Save and update your theme.
B. Use Custom Fields/Post Editor for Specific Pages
- Enable Custom Fields (in the post/page editor options).
- Paste the JSON-LD code directly into a custom field or use a Custom HTML block in Gutenberg.
- Save and update. This method adds schema only to chosen pages/posts.
C. Add Schema with functions.php and wp_head Hook
- Open your child theme’s functions.php.
- Use a conditional PHP snippet to target only certain pages:
function add_custom_schema() {
  if (is_single()) {
    ?>
    <script type="application/ld+json">
    { ...your schema JSON... }
    </script>
    <?php
  }
}
add_action('wp_head', 'add_custom_schema');
- This method is lightweight, safe, and survives theme updates when using a child theme.
Best Manual Practices:
- Always use a child theme for safety.
- Regularly check your markup in Google Search Console.
- Avoid duplicating schema if your SEO plugin already adds it.
Common Schema Types for Different Website Projects
| Schema Type | Best For | Where to Use |
|---|---|---|
| Article | Blog/news posts | Single posts or news sections |
| Product | E-commerce | Product pages |
| Event | Events/conferences | Events, concerts, webinars |
| LocalBusiness | Local companies | Contact/About pages |
| FAQ | Help centers, guides | FAQs, tutorials |
| Review | Product/services | Product, service, or testimonial sections |
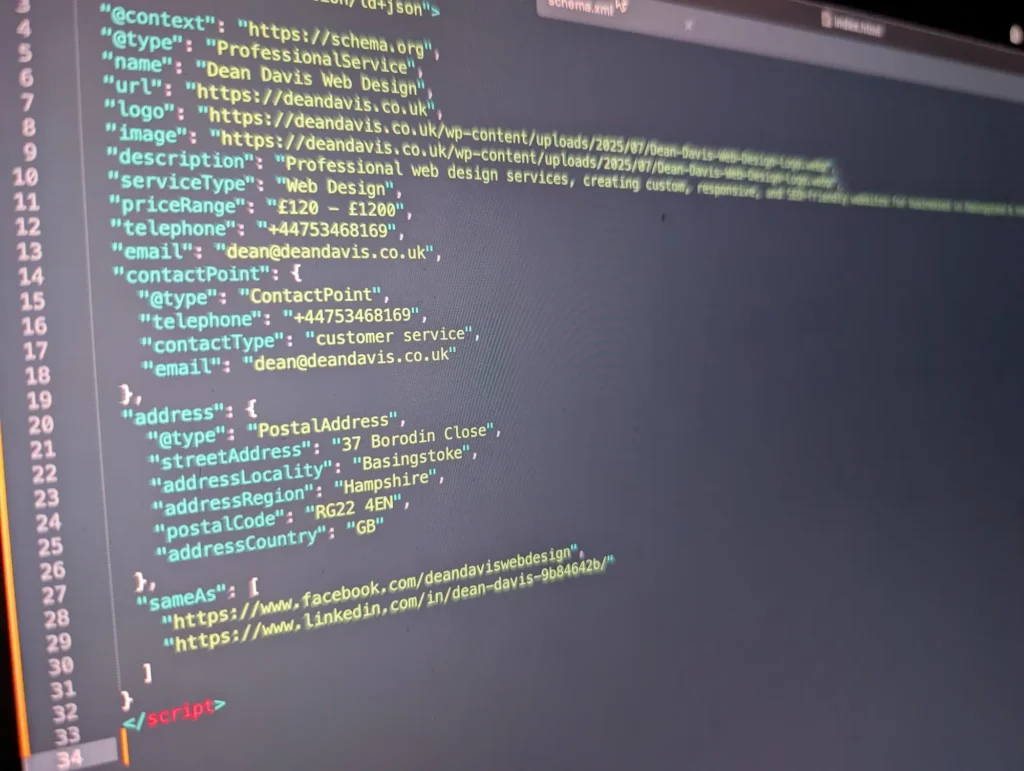
Example of a Schema Code for Local Business
<script type="application/ld+json">
{
  "@context": "https://schema.org",
  "@type": "ProfessionalService",
  "name": "Dean Davis Web Design",
  "url": "https://deandavis.co.uk",
  "logo": "https://deandavis.co.uk/wp-content/uploads/2025/07/Dean-Davis-Web-Design-Logo.webp",
  "image": "https://deandavis.co.uk/wp-content/uploads/2025/07/Dean-Davis-Web-Design-Logo.webp",
  "description": "Professional web design services, creating custom, responsive, and SEO-friendly websites for businesses in Basingstoke & the UK.",
  "serviceType": "Web Design",
  "priceRange": "£120 - £1200",
  "telephone": "+44753468169",
  "email": "dean@deandavis.co.uk",
  "contactPoint": {
    "@type": "ContactPoint",
    "telephone": "+44753468169",
    "contactType": "customer service",
    "email": "dean@deandavis.co.uk"
  },
  "address": {
    "@type": "PostalAddress",
    "streetAddress": "37 Borodin Close",
    "addressLocality": "Basingstoke",
    "addressRegion": "Hampshire",
    "postalCode": "RG22 4EN",
    "addressCountry": "GB"
  },
  "sameAs": [
    "https://www.facebook.com/deandaviswebdesign",
    "https://www.linkedin.com/in/dean-davis-9b84642b/"
  ]
}
</script>
Testing and Validating Your Schema
After adding schema (via plugin or manually), always test your site:
- Google Rich Results Test
- Schema Markup Validator
- Google Search Console Enhancements
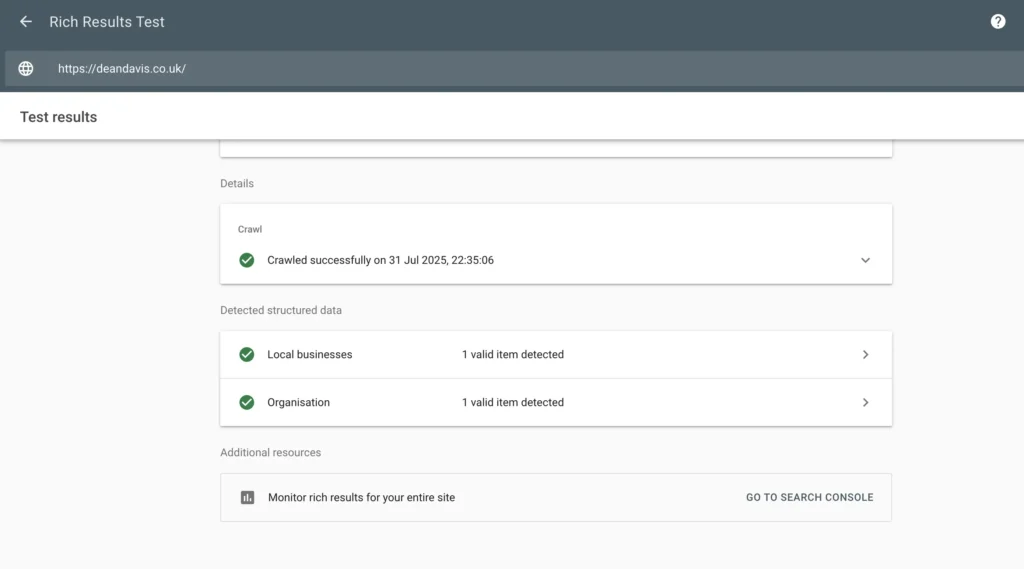
This ensures the code is read correctly and will lead to the desired SERP enhancements.
Expert Insights: Why I Add Schema Code for Every Client
As a freelancer running my own business, high-performing client sites are key to my reputation and referrals. Adding schema is a win-win:
- It gives clients an extra edge in search results.
- Enhances rich features like product stars, FAQs, and knowledge panels.
- Demonstrates a “white-hat” commitment to technical SEO.
- Builds trust and transparency, as clients see real search improvements.
Implementing schema for clients pays off in faster organic growth and happier clients—which, in turn, grows my freelance business. It’s a must-have in every successful WordPress project.